
Free dilapidation report
Free dilapidation report (PDF-ready). Record the pre and post condition of adjacent property with existing damage, photos and notes.
Updated 5 July 2026
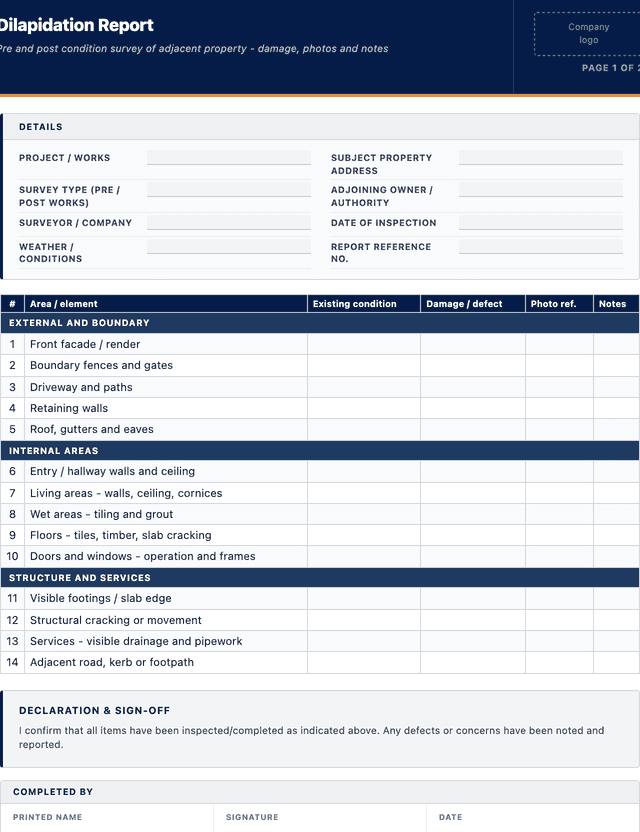
Dilapidation Report
Pre and post condition survey of adjacent property - damage, photos and notes
EXTERNAL AND BOUNDARY
INTERNAL AREAS
STRUCTURE AND SERVICES
How to use: download the PDF, print or complete digitally on any device.
- PDF format, ready to print or fill on screen
- Use as-is or customise to suit your operation
- Go digital in MapTrack for photos, reminders and audit trails
Download free PDF template
Use in MapTrack →



Trusted by teams across Australia and New Zealand
We respect your privacy. Unsubscribe anytime.
Or set it up in MapTrack
- Fill it in on a phone, attach photos to any check
- Automatic reports and audit trails
- Upload the PDF and MapTrack drafts the form for you
Free 30-day trial. No credit card. Personal email accepted.
Don't just download it - use it live. Start a free workspace, upload this dilapidation report and MapTrack drafts it as a form your crew can run from a phone.

Co-Founder & Commercial Director
Key takeaways
- The MapTrack dilapidation report contains 14 checks across 3 sections. Sections covered: EXTERNAL AND BOUNDARY, INTERNAL AREAS, STRUCTURE AND SERVICES.
Enter your email below to download this dilapidation report as a ready-to-use PDF.
Used by construction, mining and field service teams











What is a dilapidation report?
A dilapidation report is a documented condition survey of a property or structure next to a construction or civil works site, recording its existing state before work starts and again after work finishes. For each area inspected it captures the location, a description of the existing condition, any cracks, movement, defects or damage found, and photographs that fix the condition in time. A pre-works report establishes the baseline, and a post-works report compares against it, so any new damage caused by vibration, excavation, dewatering or piling can be told apart from wear and pre-existing defects.
On any project near neighbouring buildings, roads, fences, retaining walls or services, a dilapidation report is the evidence that protects both the builder and the neighbour. Ground movement, vibration from compaction and piling, and excavation close to boundaries can crack render, shift footings or damage pavements, and disputes over who caused what are common and expensive. A dated, photographed report is often a condition of the development approval, the construction contract or the works method, and gives an objective record if a damage claim arises. It matters most when it is done thoroughly before a sod is turned, because a condition you did not record before works is very hard to argue was pre-existing afterward.
Learn more about asset tracking in MapTrack.
Benefits of using this dilapidation report
- Clear baseline: a pre-works record of existing cracks and defects proves what damage was already there before you started.
- Dispute protection: dated photos and notes give an objective record if a neighbour later claims the works caused damage.
- Fair to neighbours: a documented condition survey reassures adjoining owners their property state is recorded and protected.
- Approval compliance: many development consents and contracts require a dilapidation report, so it keeps the project conditions met.
- Photo evidence: image references tied to each area fix the condition in time far better than a written note alone.
- Pre versus post clarity: comparing the after survey to the baseline isolates genuinely new damage from pre-existing defects.
- Cost control: catching and attributing damage early avoids inflated or unfounded claims settled long after the works finish.
Benefits of digitising forms in MapTrack
When you move from paper or static PDFs to digital forms in MapTrack, you get:
- Field users can easily scan a QR code to complete a form on mobile. Unlimited users.
- Email the right people when a form is submitted, with an automation you set up.
- File every completed form against the asset, location or person it covers.
- Download any completed form as a PDF, with failed answers listed at the top.
- Fill in forms offline; they upload when the device is back online.
- Build conditional logic (show or hide questions based on answers).
- Take pictures or attach photos. Not possible with a paper-based form.
- Electronic signatures.
- Edit forms later without reprinting.
- Set who can view, fill in or edit forms with user roles.
- Upload a paper form (PDF, Word, Excel or a photo) and MapTrack's AI builds a digital version for you to check.
- Collect SWMS sign-ons as signed forms against each site.
- Track tool and plant movements between job sites as they are scanned, checked out and returned.
- Download completed site forms as PDFs when a principal contractor asks for them.
Book a demo to see how MapTrack handles forms.
Try MapTrack free for 30 days
Full access to every feature. No credit card required. Per-asset pricing so you scale as your fleet grows.
- No credit card required
- 30 days free trial
- Cancel anytime
1-2 days/week saved
“Bloody amazing! We used to spend 1-2 days a week tracking and managing our generators alone.”

Steve McAllister
Asset Coordinator, Saunders International
What to include in a dilapidation report
This dilapidation report covers 10 key areas:
- Report header: project, works description, and pre-works or post-works survey
- Subject property address and description (building, fence, road, retaining wall or service)
- Adjoining owner or authority details and access arrangements
- Surveyor name, company, and date of inspection
- Weather and site conditions at the time of survey, where relevant
- Area or element inspected, room by room or zone by zone
- Existing condition description and materials
- Existing damage or defects: cracks, movement, staining, spalling, or displacement
- Photo reference numbers tied to each area and defect
- Overall condition summary and acknowledgement or signatures of the parties
How to use this dilapidation report
- Set the scope and access: Agree with the adjoining owner or authority which properties and elements are in scope, such as the building, boundary fences, driveway, retaining walls and any services, and arrange access. A report that misses an area cannot protect you later, so confirm scope before the inspection and record anything you were unable to access and why.
- Inspect methodically area by area: Work through the property in a consistent order, room by room and then external elements, so nothing is skipped. Describe the existing condition and materials of each area, and note every crack, sign of movement, stain, spall or displacement you find, however minor, because small existing defects are exactly what disputes later hinge on.
- Photograph and reference every defect: Take clear, dated photographs of each area and of every defect, and tie each image to a reference number in the report so the photo and the written note match. Include something for scale on cracks where you can. A defect described in words but not photographed is much weaker evidence than one fixed in a dated image.
- Record the baseline and have it acknowledged: Compile the pre-works survey into a dated report and have the adjoining owner or their representative acknowledge or sign it where possible, so the baseline is agreed rather than merely asserted. Give them a copy. An acknowledged baseline is far harder to dispute than one produced only by the builder after a claim arises.
- Repeat after works and compare: Once the works that could affect the property are complete, repeat the survey in the same order and compare each area against the baseline. Record any new or worsened damage, photograph it, and note the likely cause. This before-and-after comparison is what isolates genuine works-related damage from the defects that were already present.
In MapTrack, you can track construction equipment across every site. Each submission is stored as a timestamped PDF against the asset record.
Get the free templateEnter your email above to download the full dilapidation report as a PDF.Back to download formHow often should you complete this form?
Complete a pre-works dilapidation report before any work starts that could affect an adjoining property, and always before excavation, piling, compaction, demolition or dewatering near a boundary. On larger jobs you may also do interim surveys at key stages, such as after piling or bulk excavation.
Complete the post-works report once the works capable of causing damage are finished, and compare it against the baseline. Where a project runs for a long time or the ground conditions are sensitive, more frequent condition checks reduce argument about when any damage occurred. The single most important timing rule is that the baseline survey must be done before works begin, because a condition not recorded beforehand is very hard to prove was pre-existing.
Frequently asked questions
Applicable regulatory standards
This template is a starting point. Check the current requirements that apply to your equipment, work and location. The template alone does not establish compliance.
- Development consent conditions under each state or territory's planning legislation (for example the Environmental Planning and Assessment Act 1979 (NSW)); a dilapidation report is frequently a consent condition
- Construction contract conditions that require a condition survey (for example AS 4000-1997 General conditions of contract)
- Model Work Health and Safety (WHS) Regulations (excavation and demolition work duties), as enacted in each state and territory; in Victoria, the Occupational Health and Safety Regulations 2017 (Vic)
- AS 2601-2001 The demolition of structures (where demolition applies)
Dilapidation Report preview
The numbers behind this dilapidation report
Every figure below is sourced and dated, so you can quote it in a toolbox talk, a budget case or a board paper without having to chase the original report.
Embed this free template on your website
Run an industry blog, trade association site, or training resource? Drop a preview of this free dilapidation report straight into your page. The snippet is self-contained, needs no scripts, and links readers back to the full free template.
<div style="max-width:480px;font-family:system-ui,-apple-system,'Segoe UI',Roboto,sans-serif;border:1px solid #E5E7EB;border-radius:12px;padding:20px;background:#ffffff;">
  <p style="font-size:12px;font-weight:700;letter-spacing:0.05em;text-transform:uppercase;color:#071D49;margin:0;">Free template</p>
  <p style="font-size:18px;font-weight:700;color:#071D49;margin:6px 0 0;">Dilapidation Report</p>
  <ul style="margin:12px 0 0;padding-left:18px;color:#374151;font-size:14px;line-height:1.6;">
    <li style="margin:4px 0;">Report header: project, works description, and pre-works or post-works survey</li>
    <li style="margin:4px 0;">Subject property address and description (building, fence, road, retaining wall or service)</li>
    <li style="margin:4px 0;">Adjoining owner or authority details and access arrangements</li>
    <li style="margin:4px 0;">Surveyor name, company, and date of inspection</li>
    <li style="margin:4px 0;">Weather and site conditions at the time of survey, where relevant</li>
    <li style="margin:4px 0;">Area or element inspected, room by room or zone by zone</li>
  </ul>
  <p style="font-size:13px;color:#6B7280;margin:14px 0 0;padding-top:12px;border-top:1px solid #E5E7EB;">Free <a href="https://www.maptrack.com/templates/dilapidation-report-template" style="color:#071D49;font-weight:600;text-decoration:none;">Dilapidation Report</a> by MapTrack</p>
</div>Free to reuse, including commercially. This template is published under a Creative Commons Attribution 4.0 licence. Copy it, adapt it, put it on your own site or in your own docs. All we ask is that you credit MapTrack with a link back to this page. The snippet above already includes that credit, so if you use it as-is you’re covered.
Cite this template
Writing about this topic? You’re welcome to quote this checklist. Here’s the wording to use so your readers can find the original.
The MapTrack dilapidation report contains 14 checks across 3 sections.
- Short attribution
- MapTrack Dilapidation Report, https://www.maptrack.com/templates/dilapidation-report-template
- Reference list
- MapTrack. (2026). Dilapidation Report [Checklist template]. Retrieved from https://www.maptrack.com/templates/dilapidation-report-template
Free to reuse with credit under a Creative Commons Attribution 4.0 licence. If you’d rather link straight to it, the page is https://www.maptrack.com/templates/dilapidation-report-template.
Need to track construction equipment across every site?
Register every asset in MapTrack, attach digital forms, and get a complete history of every inspection, service and compliance record.