
Free template · PDF
Free equipment isolation procedure template
Free equipment isolation procedure (PDF-ready). Isolate, lock and verify zero energy across electrical, mechanical, hydraulic, pneumatic and stored energy.
Loading PDF page...
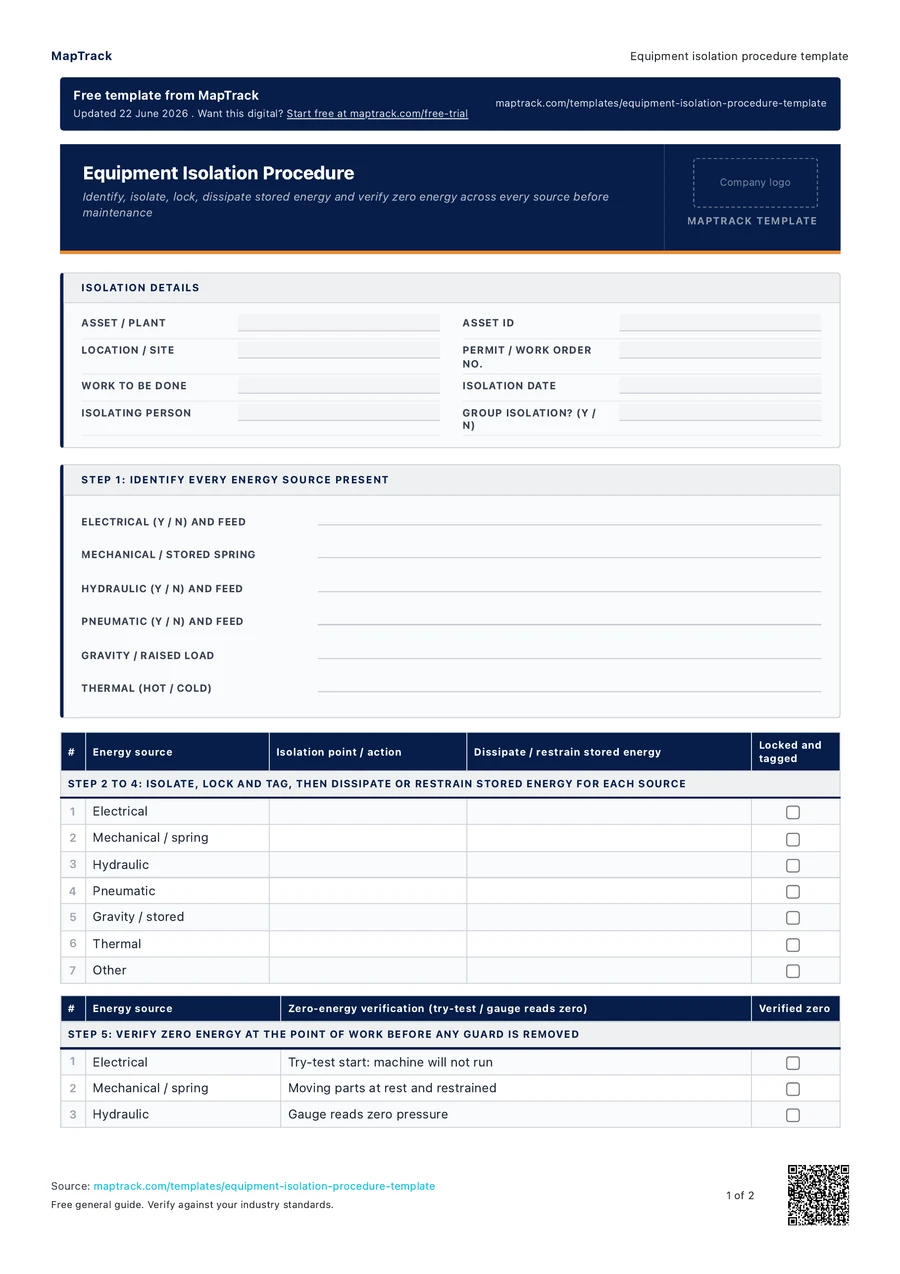

Read the form fields
13 checks · 2 sections · Sign-off
13 checks
The fields in the printable form, in a view that fits your screen.
- Asset / plant
- Asset ID
- Location / site
- Permit / work order no.
- Work to be done
- Isolation date
- Isolating person
- Group isolation? (Y / N)
Step 2 to 4: Isolate, lock and tag, then dissipate or restrain stored energy for each source
Step 5: Verify zero energy at the point of work before any guard is removed
Isolation applied and verified by
Signature · Print name · Time · Date
Isolation removed / returned to service by
Signature · Print name · Time · Date
The MapTrack equipment isolation procedure template contains 13 checks across 2 sections.

Make this form your own
Add your fields and logo. Give your team a form they can use on site.
Free 30-day trial. No credit card. Work email needed.
Upload & use this form now for free



“MapTrack beat them all in every aspect.”
 Vincent Stone · HSEQ Advisor, Concept Tanks
After signup: upload this PDF, check the form MapTrack drafts, then save and publish it for your team.
General guidance only. Check the form against your equipment manual, site procedures and local requirements before using it.
Key takeaways
- The MapTrack equipment isolation procedure template contains 13 checks across 2 sections. Sections covered: Step 2 to 4: Isolate, lock and tag, then dissipate or restrain stored energy for each source, Step 5: Verify zero energy at the point of work before any guard is removed.
- An isolation procedure removes and proves zero energy across electrical, mechanical, hydraulic, pneumatic, stored and thermal sources.
- It differs from a lockout checklist by isolating and verifying every energy source, not just confirming locks are on.
- Stored energy such as trapped pressure or a raised load must be dissipated or restrained, not just isolated.
- A try-test verification against each source proves the machine is dead before any guard comes off.
- A dated isolation record is evidence for WHS energy isolation duties and AS 4024 prevention of unexpected start-up.
What is an equipment isolation procedure template?
An equipment isolation procedure is the controlled method for making a machine safe to work on by removing every form of stored and live energy before maintenance begins, then proving it is gone. Unlike a single lockout tag, this procedure works across all energy sources on the plant: electrical, mechanical, hydraulic, pneumatic, gravity or stored mechanical energy, and thermal. For each source it sets out the sequence to identify the energy, isolate it at the right point, lock and tag the isolation, dissipate or restrain any stored energy, and then verify zero energy at the machine before any guard comes off or any hand goes in.
Isolation is the control that stands between a maintainer and the most severe injuries on a worksite, because unexpected start-up or the release of stored energy during a repair is a recognised cause of fatalities. A documented multi-energy procedure makes the safe sequence repeatable for every person who works on the asset, rather than relying on memory or the most experienced fitter being present. It also gives the duty holder evidence that the plant energy isolation requirements of the Work Health and Safety Regulation and the prevention of unexpected start-up principles in AS 4024 have been met, with a verification step recorded against each energy source rather than assumed.
Learn more about compliance and inspections in MapTrack.
Choose the format that fits your team
Download the PDF
Use the original printable form for a paper workflow. Check it against your equipment and site procedure before the job.
Keep completed copies in your own record system and arrange any follow-up through your normal process.
Download free PDFCustomise a form in MapTrack
Start a free trial, upload this PDF and MapTrack drafts the form. Adjust it to your workflow, then save and publish it for your team to use.
Sample answers on this page and completed PDF records aren't imported automatically.
Upload & use this form now for freeFree 30-day trial. No credit card. Work email needed.
Benefits of using this equipment isolation procedure template
- All energy sources covered: a source-by-source method stops the common failure of locking out the power but forgetting trapped hydraulic, pneumatic or gravity energy.
- Verified dead, not assumed: a try-test verification step against each source proves zero energy at the machine before any guard is removed or work starts.
- Repeatable for everyone: a written sequence makes the safe method the same for every maintainer, not dependent on the most experienced person being on shift.
- Fewer start-up incidents: locking and tagging each isolation point removes the risk of a machine being energised while someone is working inside it.
- Clear group control: defined lock points and a permit step let multiple trades work on one asset under a controlled, accountable isolation rather than informal calls.
- Audit and incident evidence: a completed, dated isolation record demonstrates compliance with WHS energy isolation duties and AS 4024 prevention of unexpected start-up.
What to include in an equipment isolation procedure template
- Asset and task: machine, location, work to be done and the permit or work order number
- Energy source register: every source present on the machine and where it is fed from
- Electrical isolation: isolator or breaker, lock point, and the verified de-energised test
- Mechanical isolation: stored springs, flywheels and moving parts restrained or blocked
- Hydraulic isolation: valves closed, locked and pressure bled to zero at a gauge
- Pneumatic isolation: air supply isolated, locked and residual pressure vented to zero
- Gravity and stored energy: raised loads lowered or mechanically supported and pinned
- Thermal isolation: hot or cold surfaces and lines isolated and allowed to reach a safe temperature
- Lock and tag list: each lock applied, by whom, and the personal danger tag fitted
- Zero-energy verification: the try-test result recorded against each source before work
- Restoration: guards refitted, locks removed in order, and the machine returned to service
How to use this equipment isolation procedure template
Identify every energy source on the machine
Before touching anything, work through the asset and list every source of energy present: electrical, mechanical, hydraulic, pneumatic, gravity or stored, and thermal. Missing a single source is the most common cause of an isolation failure, so use the machine drawings if the feeds are not obvious.
Shut down and isolate each source at the correct point
Shut the machine down using the normal stop, then isolate every source at its designated isolation point, not just at the control panel. Open the breaker, close the valve, isolate the air, and confirm each isolation point is the one that actually breaks the supply to the machine.
Lock, tag and control the isolation
Apply a personal lock and danger tag to each isolation point so it cannot be reopened. Where several people work on the asset, use a group lockout point and a permit so every worker has a lock on and the isolation cannot be removed while anyone is still exposed.
Dissipate or restrain stored energy
Release the energy that remains after isolation: bleed hydraulic and pneumatic pressure to zero at a gauge, lower or mechanically support raised loads, restrain springs and flywheels, and allow hot or cold components to reach a safe temperature before work.
Verify zero energy, then work and restore
Prove the isolation by trying to start the machine and testing for zero energy at the point of work against each source, then record the verification. After the work, refit guards, remove locks and tags in the correct order, and confirm the machine is clear before returning it to service.
How often should you complete this service procedure?
Apply the isolation procedure every time a person needs to work on plant where unexpected start-up or the release of stored energy could cause harm, including maintenance, repairs, cleaning, clearing blockages and setting. It is used per task, not on a schedule, and a fresh isolation is performed for each job rather than relying on an isolation left in place from earlier work.
Review the written procedure for each machine when the plant changes, after any isolation-related incident or near miss, and at the regular interval set in your safety management system. New or modified plant should have its energy sources and isolation points confirmed during commissioning, so the procedure that maintainers rely on matches the machine in front of them rather than an earlier configuration.
Make this form your own
From your template to your team.
Upload this PDF and MapTrack drafts the form. Adjust it for your equipment and site, then save and publish the digital form for your team.
- 01
Start your free trial
Use your work email to create your MapTrack account.
- 02
Customise, save and publish
Adjust the template fields and branding for your site.
- 03
Complete it on the job
Record checks, add photos and export a branded PDF.
Keep working offline
Load the form before you lose reception. Complete it offline and sync when you're back online.
Scan the asset. Open its form.
Use an asset's QR code to find and complete the forms that belong to it.
Show what you found
Capture photos and attach files so the next person has the details they need.
Take a branded PDF with you
Download completed forms as PDF reports with your company logo.
Completed paper records aren't imported automatically.
Frequently asked questions
Practical answers about the form, record keeping and using MapTrack.
The Work Health and Safety Regulation requires a person conducting a business to manage risks from plant, including making sure plant is isolated from energy sources before maintenance or cleaning where unexpected start-up or stored energy could cause harm. AS 4024 sets out the prevention of unexpected start-up. A documented isolation procedure that identifies every source, locks and tags each one, dissipates stored energy and verifies zero energy meets those duties and records the proof, which is what an inspector or an incident review will look for.
Link to this answerA lockout-tagout checklist confirms that locks and tags have been applied, which is one part of the job. A multi-energy isolation procedure is the full method: it identifies every energy source on the machine, sets the isolation point for each, then dissipates stored energy and verifies zero energy source by source before work. The difference matters because most serious isolation failures come from energy that was never the electrical supply: trapped hydraulic pressure, a raised load, or a charged accumulator that a simple lock count never addresses.
Link to this answerLocking out controls the isolation point, but it does not prove the machine is actually dead, and isolation points can be mislabelled, faulty or feeding the wrong machine. Verification closes that gap: you try to start the machine using the normal controls to confirm it will not run, then test for zero energy at the point of work for each source. Only a successful verification proves it is safe to remove a guard or place a hand inside, which is why the step is recorded against every energy source.
Link to this answerReapply isolation for every separate task and whenever control of the work changes hands, never carrying an old isolation across to new work. Review the written procedure for the machine when the plant is modified, when a new energy source is added, after any isolation incident or near miss, and at the interval set in your safety system. New or altered plant should have its sources and isolation points confirmed at commissioning so the procedure stays accurate for the people relying on it.
Link to this answerYes, it is completely free. It downloads as a PDF you can keep or print for the toolbox. You do not need a MapTrack account. If you want to move beyond paper, MapTrack attaches isolation procedures and permits to each asset, records who isolated what and when, and keeps the verification against the machine history. Start free or book a demo to see how.
Link to this answerApplicable regulatory standards
This form is a starting point. Check the current requirements that apply to your equipment, work and location. The form alone does not establish compliance.
- Work Health and Safety Regulation 2025 (NSW), duties for proper use of plant controls and guarding (s206, s208)
- Safe Work Australia Code of Practice: Managing the risks of plant in the workplace (isolation and energy control before maintenance)
- AS 4024.1603 Safety of machinery, prevention of unexpected start-up
- AS/NZS 4836 Safe working on or near low-voltage electrical installations
- ISO 45001:2018 Occupational health and safety management systems
- Model Code of Practice: Managing risks of plant in the workplace (Safe Work Australia)
- Model WHS Regulations (Safe Work Australia)
- ISO 45001:2018, Occupational health and safety management systems (ISO catalogue)
- AS 4024 series, Safety of machinery (Standards Australia listing)
MapTrack publishes this template. The linked authorities publish their own guidance; they haven't endorsed this form.
The numbers behind this equipment isolation procedure template
Every figure below is sourced and dated, so you can quote it in a toolbox talk, a budget case or a board paper without having to chase the original report.
Cite this template
Writing about this topic? You’re welcome to quote this checklist. Here’s the wording to use so your readers can find the original.
The MapTrack equipment isolation procedure template contains 13 checks across 2 sections.
- Short attribution
- MapTrack Equipment isolation procedure template, https://www.maptrack.com/templates/equipment-isolation-procedure-template
- Reference list
- MapTrack. (2026). Equipment isolation procedure template [Checklist template]. Retrieved from https://www.maptrack.com/templates/equipment-isolation-procedure-template
Free to reuse with credit under a Creative Commons Attribution 4.0 licence. If you’d rather link straight to it, the page is https://www.maptrack.com/templates/equipment-isolation-procedure-template.
Embed this free template on your website
Run an industry blog, trade association site, or training resource? Drop a preview of this free equipment isolation procedure template straight into your page. The snippet is self-contained, needs no scripts, and links readers back to the full free template.
<div style="max-width:480px;font-family:system-ui,-apple-system,'Segoe UI',Roboto,sans-serif;border:1px solid #E5E7EB;border-radius:12px;padding:20px;background:#ffffff;">
  <p style="font-size:12px;font-weight:700;letter-spacing:0.05em;text-transform:uppercase;color:#071D49;margin:0;">Free template</p>
  <p style="font-size:18px;font-weight:700;color:#071D49;margin:6px 0 0;">Equipment isolation procedure template</p>
  <ul style="margin:12px 0 0;padding-left:18px;color:#374151;font-size:14px;line-height:1.6;">
    <li style="margin:4px 0;">Asset and task: machine, location, work to be done and the permit or work order number</li>
    <li style="margin:4px 0;">Energy source register: every source present on the machine and where it is fed from</li>
    <li style="margin:4px 0;">Electrical isolation: isolator or breaker, lock point, and the verified de-energised test</li>
    <li style="margin:4px 0;">Mechanical isolation: stored springs, flywheels and moving parts restrained or blocked</li>
    <li style="margin:4px 0;">Hydraulic isolation: valves closed, locked and pressure bled to zero at a gauge</li>
    <li style="margin:4px 0;">Pneumatic isolation: air supply isolated, locked and residual pressure vented to zero</li>
  </ul>
  <p style="font-size:13px;color:#6B7280;margin:14px 0 0;padding-top:12px;border-top:1px solid #E5E7EB;">Free <a href="https://www.maptrack.com/templates/equipment-isolation-procedure-template" style="color:#071D49;font-weight:600;text-decoration:none;">Equipment isolation procedure template</a> by MapTrack</p>
</div>Free to reuse, including commercially. This template is published under a Creative Commons Attribution 4.0 licence. Copy it, adapt it, put it on your own site or in your own docs. All we ask is that you credit MapTrack with a link back to this page. The snippet above already includes that credit, so if you use it as-is you’re covered.
About the author

Co-Founder & Commercial Director
Jarrod has spent over a decade in technology consulting and asset management, including roles at Accenture (mining and heavy industry) and CGI as an Asset Management Consultant. He co-founded MapTrack and built and scaled its original platform, then rebuilt it with Lachlan and Alex from thousands of customer conversations and 300+ user research sessions with field teams. His consulting background gives him deep insight into the operational and compliance challenges facing asset-intensive Australian businesses.
View LinkedIn profile →Ready for your next job?
Keep the PDF handy, or upload it to MapTrack and turn it into a digital form for your team.